DIY Fall Leaf Candle
By Taylor on October 24, 2013 in Blog
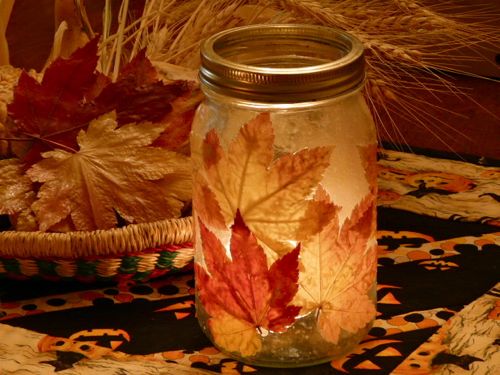
Photo by Pam Harris
The beauty of colorful fall leaves comes and goes rather quickly. But with this fun fall DIY project, the best of fall can be preserved for months even when the leaves have been replaced by snow!
What you'll need:
- Dried, pressed fall leaves
- Mod Podge
- Glass jar
- Paintbrush
- Tea candle
- Acrylic spray
Instructions:
Start by collecting freshly fallen leaves. It is best if the leaves are not especially wet and have not dried or curled at the edges yet. To prepare the leaves, place them in a single layer between the pages of a newspaper as quickly after collecting them as possible. Once the leaves are arranged on the newspaper pages, place under a stack of books for two or three weeks. After the leaves have dried, they can be used to make a fall leaf candle.
To make the candle, use the paintbrush to coat the glass jar with a layer of Mod Podge. Next, take dried leaves and press them onto the outside of the jar. Apply the leaves one at a time, trying to avoid too much overlap. Each leaf should be covered with a layer of Mod Podge as well. Try to leave a few openings and use darker leaves as accents to allow the candle light to shine through. The paintbrush can also be used to make a stippled pattern in the Mod Podge on areas not covered by leaves to help candle glow show through, too! After all the leaves have been affixed to the jar, let the craft dry. Apply one more layer of Mod Podge and after the jar has dried overnight, spray the jar with acrylic spray.
Finish this DIY project by placing a small tea candle inside the jar. It will add a unique fall accent to any space!
The idea and instructions for this project came from the Gingerbread Snowflakes crafting website.