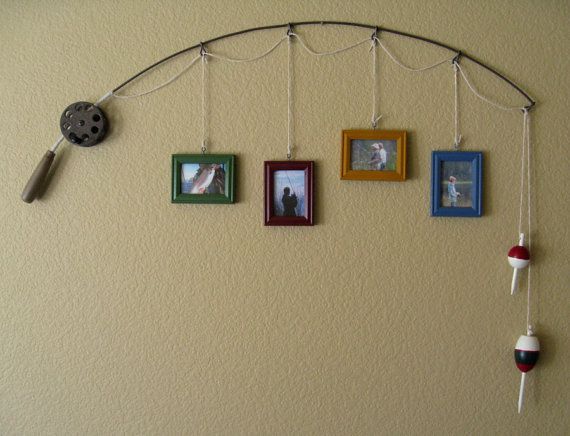
DIY Fishing Pole Picture Frame
By Taylor on July 19, 2013 in Blog
Looking for a gift for a fisherman? Do you have open space to fill? Do you just love doing crafts?
This do-it-yourself picture frame is a fun project for anyone with an appreciation for fishing and a few minutes to spare.
What you'll need:
- 36 inches of ⅜ inch thick metal wire
- Five 1½ inch strips of ⅛ inch thick metal wire
- Wooden cylinder approximately 1 inch thick, 3 inches wide
- Wooden cylinder approximately 4 inches long, 1 inch wide
- 3 yards of sturdy twine or ¼ inch twisted nylon rope
- Four wooden picture frames, 4.25 inches x 3.25 inches
- Four pictures, 3.25 inches x 2.75 inches
- Four eye hooks
- Fishing bobbers
- Drill
- Wire cutters
- Pliers
- Wood glue
Instructions:
Start by making the handle and spool of the fishing pole using a drill. You can find pre-made wooden cylinders at craft stores or if you'd like you can make them yourself.
For the fishing pole handle, use the drill to make a hole using a ⅜-inch bit in the center of the 1-inch face of the long wooden cylinder.
To make the spool, use a ¼-inch drill bit to drill eight equidistant holes through the shorter, wider cylinder near the outer edge. Using the ¼ inch drill bit on the same cylinder, make a hole for the wire to pass through. To do so, drill completely through the one inch wide face of the cylinder.
Once the handle and reel are crafted, combine with the thicker wire to make the fishing pole.
Take an end of the 36 inches of ⅜-inch thick metal wire and insert it into the hole drilled in “the handle.” It should be a tight fit. Next, lay the handle and wire on a flat surface. Then slide “the reel” onto the thick wire. Once positioned where you'd like, fill the empty space in the drill hole with wood glue. Let sit to dry.
To attach the picture frames and “fishing line” you will need to add guides to the pole.
Using pliers bend the five strips of ⅛-inch thick metal wire into figure eights. Slide the figure eights onto the pole and twist the center so they are tight on the pole. These will serve as the guides which act as picture frame, string and bobber holders.
To hang the photos, screw eye hooks into the top of picture frames. Cut four pieces of string, two at 10 inches and two at 14 inches, to hang photos. Alternating lengths of string, hang the pictures from figure eights nearest the pole's center by tying the string to the figure eights on the pole and the eye hooks on the frames.
To add the finishing touch, use string to attach bobbers to the unused guide at the rod tip. Then take unused string and thread it through the guides and wrap the remainder around the base of the pole.
Once everything is securely attached, hang or carefully transport to the lucky gift recipient!
Materials can be substituted to make this project to suit your preferences.
The idea for this project can be view at http://etsy.me/1bM90P1.