DIY Acorn Picture Frame
By Taylor on September 19, 2013 in Blog
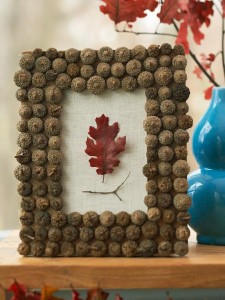
Take a walk around an oak tree this fall and you'll find plenty of fallen acorns. If you can snatch a few before the squirrels get to them, they make great embellishments for festive, fall picture frames!
What you'll need:
- Inexpensive picture frame from a craft store
- Hot glue gun
- Hot glue sticks
- Oak leaf
- Small twig
- A piece of burlap large enough to fill center of your picture frame
- A bunch of gathered acorns (just the caps will work too!)
Instructions:
Go through the pile of collected acorns. Remove the tops from the acorns and place them onto of the picture frame laid flat until you have enough to cover the area of the frame. Arrange the tops to fit on the frame as you'd like.
Plug in the hot glue gun and let sit until warm. Once warm, apply glue to the back of the acorn top and around the circumference, and place it on the picture frame. Hold firmly in place for 10 seconds while the glue sets. Repeat until each acorn top has been attached.
To create the interior of the frame, gather the piece of burlap, small twig and oak leaf. Next, measure the back of the picture frame and cut the piece of burlap to those dimensions. Place the back of the picture frame in place with the burlap pulled tight and secure. Arrange the oak leaf and small twig in the center of the frame and attach with a drop of hot glue. Hold in place for 10 seconds until the glue dries.
Finally, set this frame on a table or shelf to bring the beauty of the season into your home!
The idea for this DIY project came from the Better Homes and Gardens Blog.